
Today I'm going to cover a topic that we get asked about all the time in the office as we have lots of clients that still struggle with out of the box discounts and voucher codes and how to apply them within Magento 2.
Magento is a huge eCommerce platform that offers a world of possibilities when it comes to out of the box discounts yet it can be confusing as to how to apply them and get your head around the scope of what is possible. Today I want to clear that up and make it easier for you all because everyone likes a bargain.
There are two types of promotional rules that can be setup within Magento these are Catalog Price Rules and Cart Price Rules.
What Is A Catalog Price Rule?
Sitting inside Marketing and Catalog Price Rules these rules deal directly with product prices on a mass scale to avoid having to go into each product and increase or decrease pricing individually. Massive time saver.
What Are Catalog Price Rules Used For?
Catalog Price Rules are rules that you put in place based on a host of conditions that will then update product pricing depending on the conditions set.
A good example being product margin. If you usually sell at 20% below retail price for a certain category you could use a catalog price rule to set this on mass, especially if this percentage goes up and down depending on stock levels, seasonality, supplier promotions etc.
How Do I Set Up A Catalog Price Rule?
The rules are defined by setting certain conditions based around individual SKUs, attribute sets, categories or product names.
So let's quickly walk through setting one up. Using our previous example of reducing the retail price by 20% on all products you would follow the below steps.
First go to Marketing > Catalog Price Rules
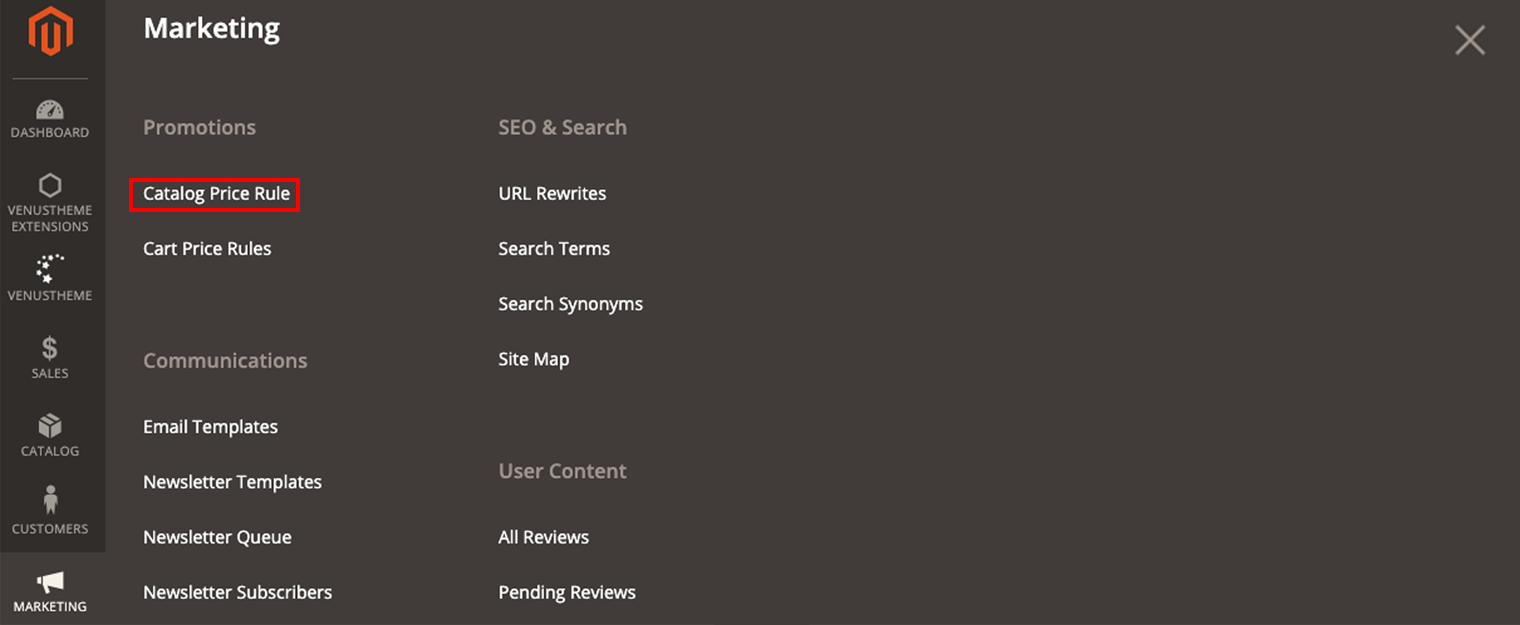
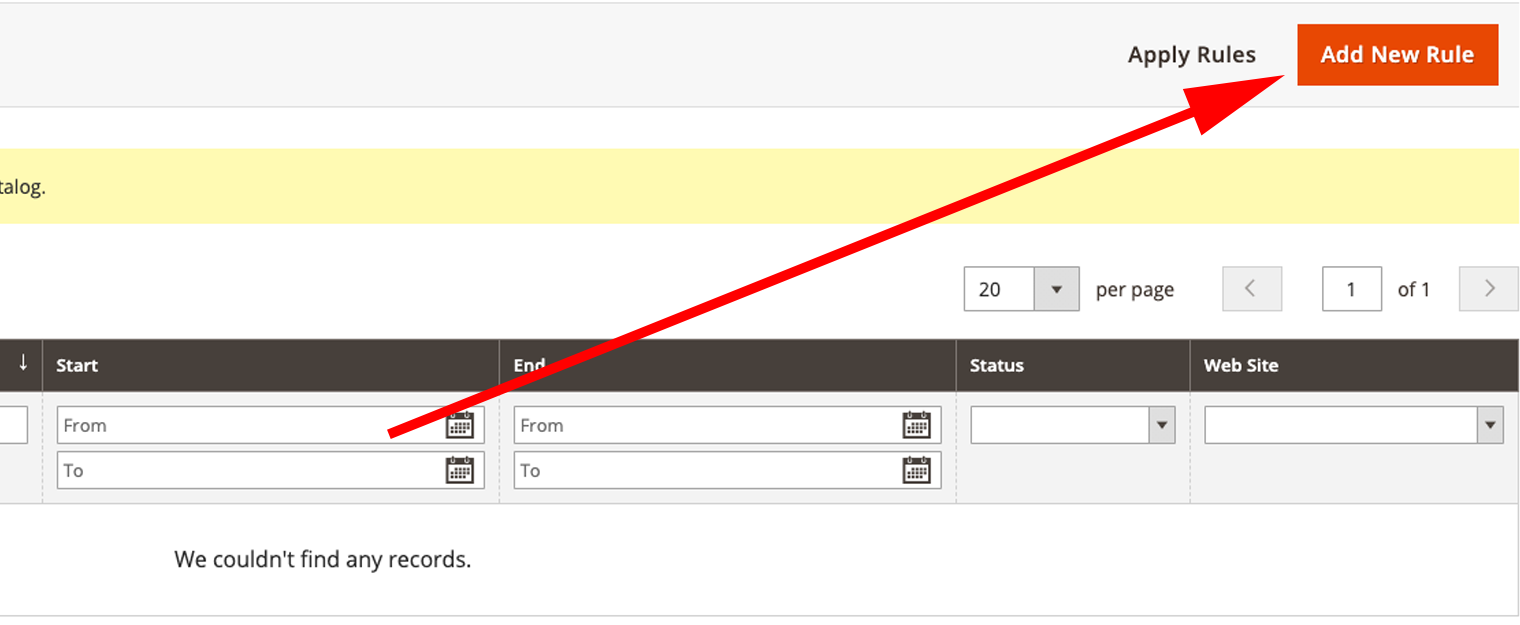
Click "Add New Rule"
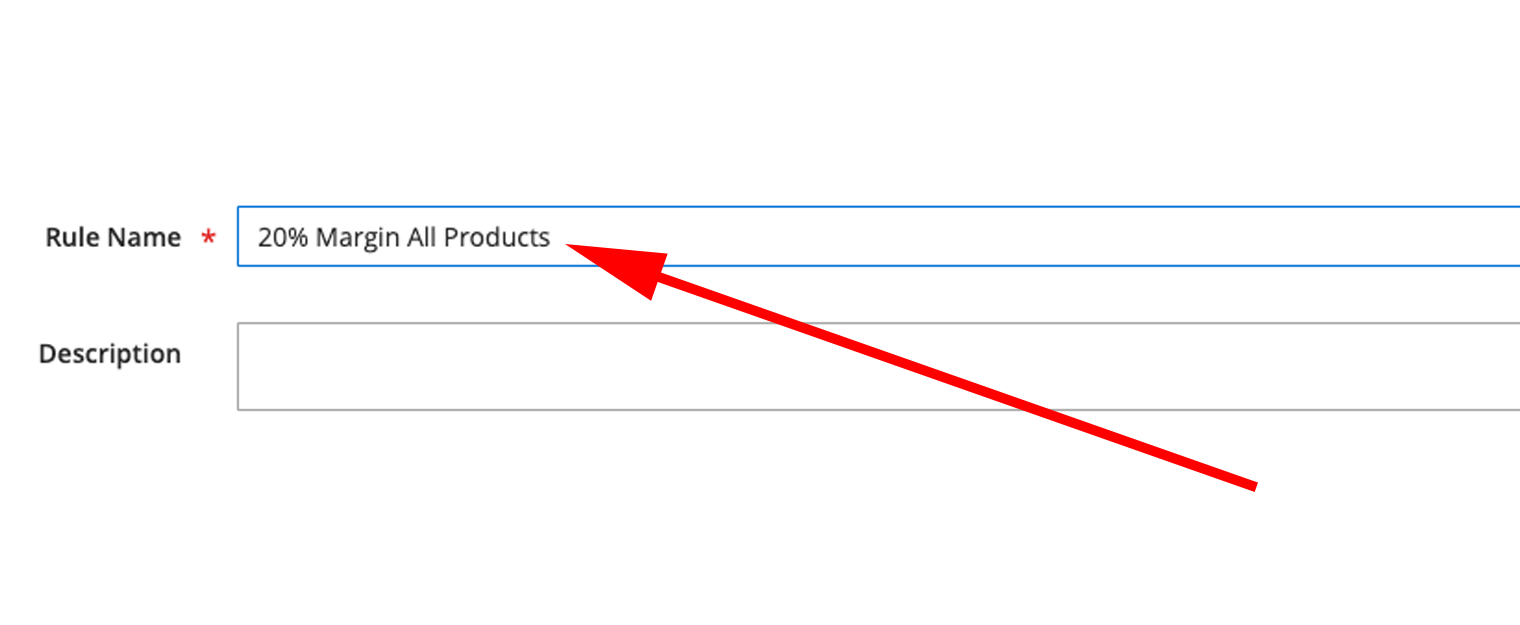
Give it a name that you will recognise at a glance
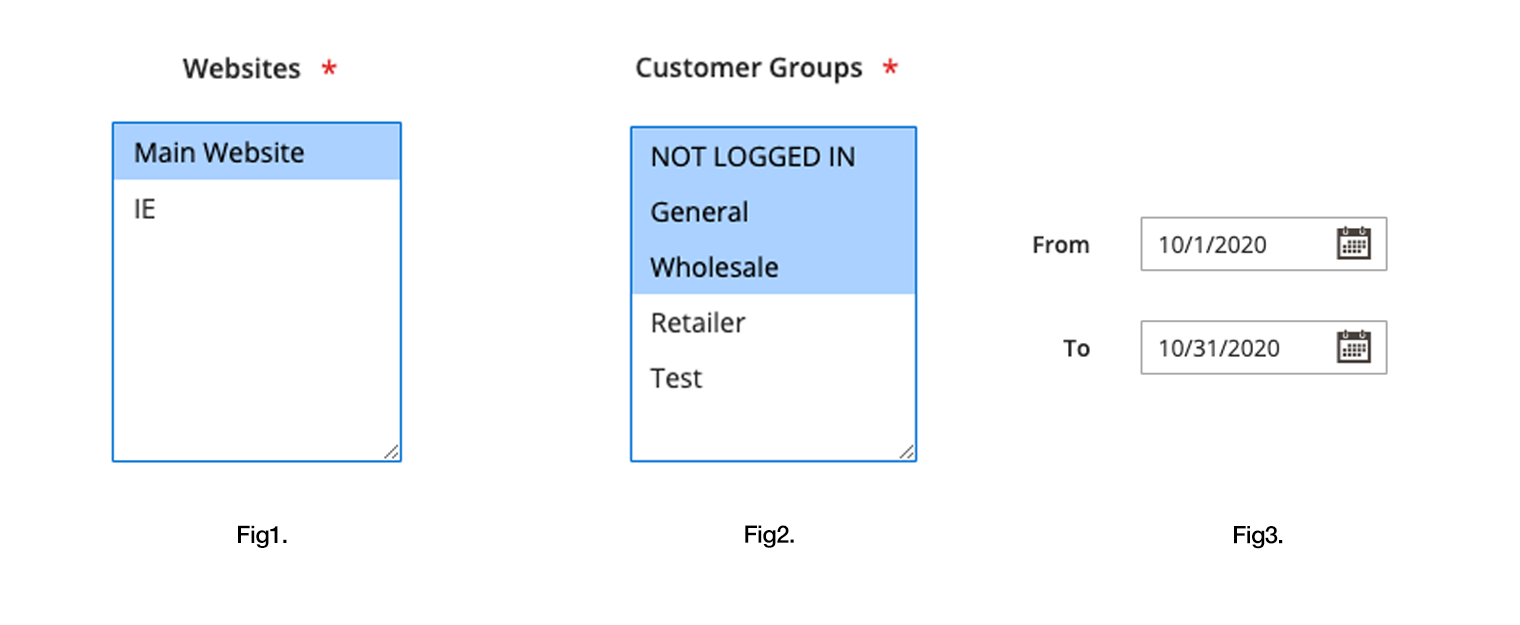
Be sure to select all of the websites you want this rule to apply to (fig 1)
Select all of the customer groups you want this to apply to. You can add more customer groups but we will cover that off in another post. (fig 2)
You can set a start and end date. This is useful if you receive a manufacturer discount for a specific time period you can easily set this here so you don't forget. (fig 3)
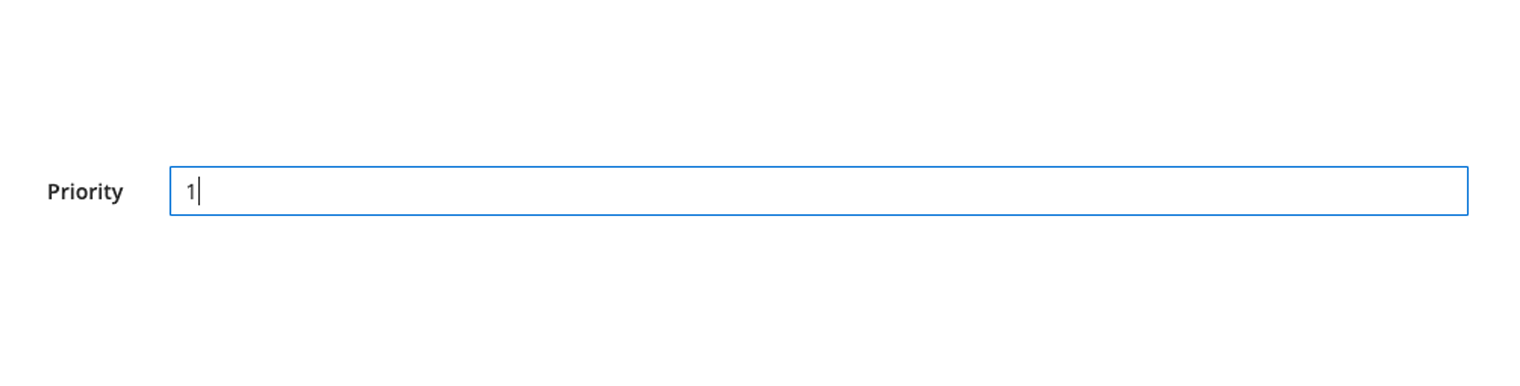
Priority. This one is often overlooked and not that important until you have lots of price rules going on. Applying a priority number here will tell Magento where to let it sit in its hierarchy.
How To Set Catalog Price Rule Conditions?
Rule Conditions are what need applying in order to trigger an action. There are many different combinations that can be applied to produce many different catalog rules.
Keeping up with our 20% reduction example let's say you want to apply a 20% reduction to all products in a certain category because your supplier is running a monthly promotion which means you can reduce your prices by a further 10% making it 30% in total.
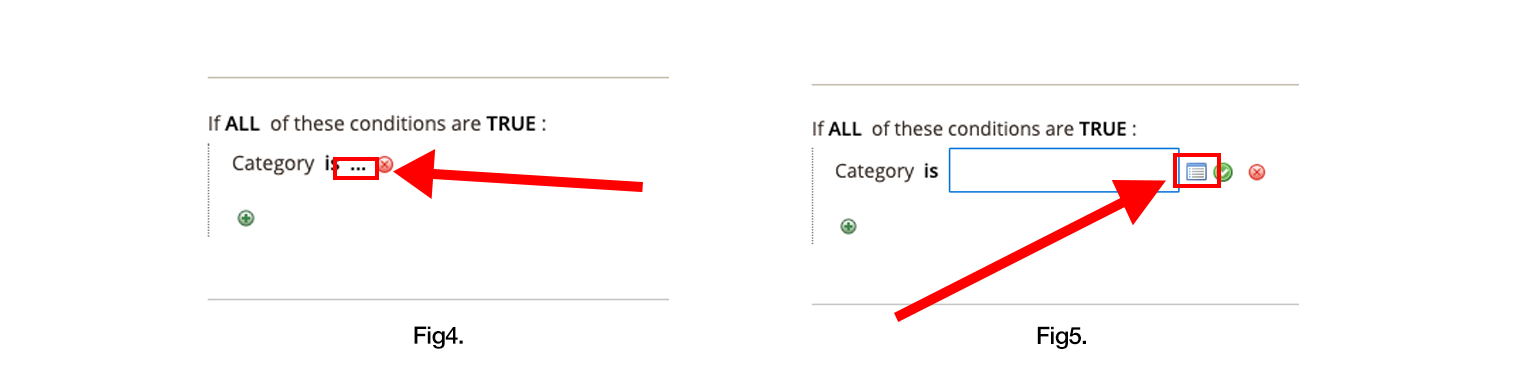
The expected outcome here would be that any product that is within category ID 27 would trigger the desired outcome of reducing prices by 30%. Clicking on the green plus sign you are presented with a series of options depending on what condition you would like to set. In our example we want to apply our action to products in a category so we select Category. If you are applying your condition to only one attribute be certain to set the condition marker to IS (Fig4).
By clicking the three dots and then the funny looking calendar icon you will be able to select the category you want to apply the discount to (Fig5.).
Creating conditions can be painful and what you expect to see is not always what you end up with. I always test my rules out before putting them live and even I end up getting it wrong a few times.
It is important to point out that the above example only uses one condition that has to be true. By clicking on the green plus sign at the bottom of this condition will open up a new condition template. In the case above if we were to add things in here these conditions must also be true for the action to be triggered.
How to Create Actions For My Catalog Rules
Our conditions have been set so next we need to decide on what needs to happen if these conditions are met. We do this in the Actions tab. Let's apply the 30% reduction to all products that qualify because they are in Category 27.
- Click into actions and decide what type of discount you want to apply. In this case we will be applying a percentage discount but you could quite easily select a fixed amount.
- Next add the amount be it a percentage or fixed amount. The next field is where you enter your percentage discount or fixed discount. For the purposes of our example you will see that we have added 30 as we want to reduce the prices by a total of 30%.
- If you want to discard other rules then simply do this using the last drop down and the system will ignore qualifying products from other rules.
- Click save and you have created your first Catalog Price Rule.
- Make sure to click "Apply Rules" in the top right hand corner to update the catalog

You may need to clear your cache before these changes take effect so if you don't see them updated immediately go and clear it.
Catalog price rules are easy to set up but worth checking out first as the Cart Price Rules follow the same format so once you have mastered these it will only be your imagination that holds you back when it comes to Cart Rules.
Cart Price Rules
A Cart Price Rule is where discounts are applied at the basket level (cart). Cart Rules can be applied using voucher codes that trigger qualifying conditions or buy simply triggering qualifying conditions. It is down to personal preference which route is taken and involves the click of a toggle.
I personally prefer to make the customer work for their discount though so let's use this method for our example and go through how to set one up using a voucher code. The initial rule setting is very similar to a catalog rule whereby you start by adding a name, the websites, customer groups, time period and priority before completing some additional fields specific to this type of rule.
The additional decisions you have to make relate to voucher codes themselves:
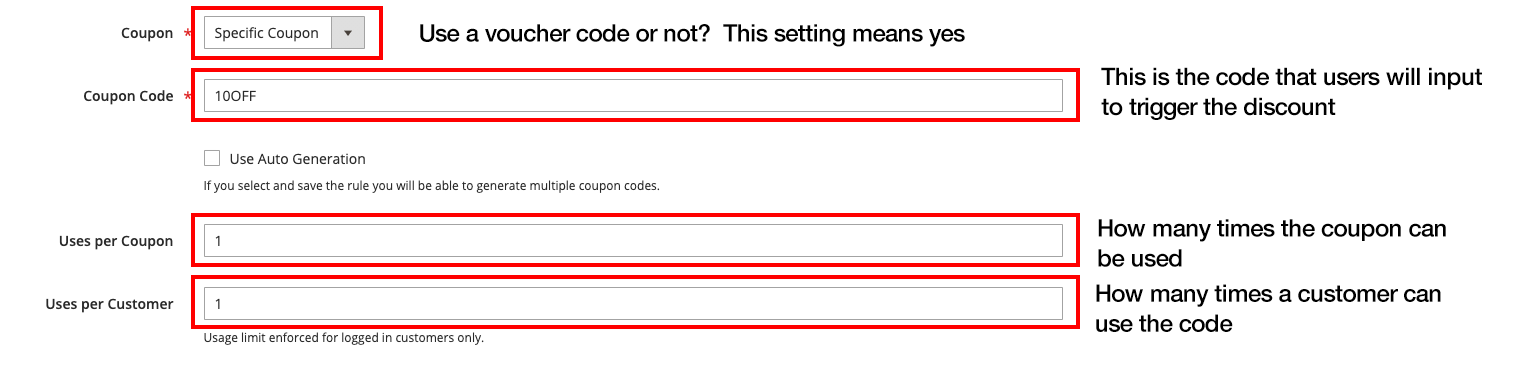
- Do you want to use a Voucher Code - Specific Coupon (Coupon)
- Voucher Code - Code you will be supplying to people to use on the site. (Coupon Code)
- Number of code uses - If you leave this at 0 it can be used infinite times
- How Many times they can use the code - If this is set to 0 it can be used as many times as a customer likes. Any other number will limit the number of times a particular customer can use the code.
So What About Cart Rule Conditions?
Conditions for cart rules work in exactly the same way as catalog rules. You can obtain the most popular Cart Rules by signing up to our blog at the bottom of this post. We will even give you all of the instructions on how to set them up too.
How To Set Up Cart Rule Actions?
The actions section has a few more options to consider over the Catalog Rules that can take a bit of getting used to. I have tried to explain them as best I can below:
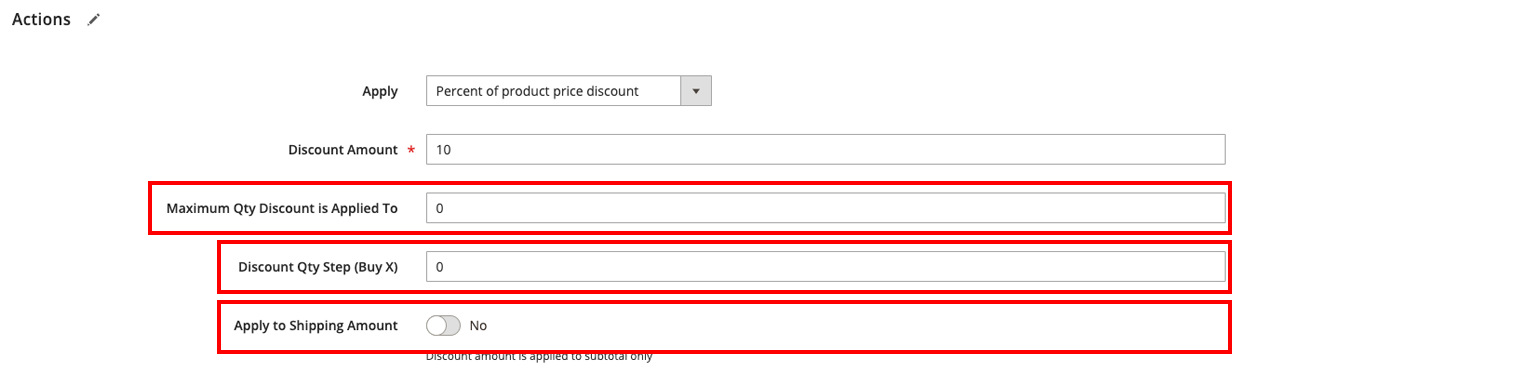
Maximum QTY Discount Is Applied To
This setting is used to set the maximum amount of products that can receive the discount. Think about it. If you are giving £5 off a particular SKU and somebody wants to buy 10 of that product do you really want to give them £5 off every one? If you do then ignore this and leave this set to 0 but if you want to limit it to say 1 you just add 1 in here. This way they will only receive the discount off one of them regardless of how many they add to their basket.
Discount QTY Step (buy X)
This is used to specify how many products need to be purchased before the customer can receive the discount. What I mean is if you want to give one product free for every three products ordered you would put 3 in this field and 1 in the discount field after selecting the "buy x get y free" option.
Apply To Shipping Amount
Decide on if you want to apply your discount to your delivery cost or not. We mostly set this to no as your carriers will probably not extend the discount so it's usually best to only apply your discount to the sub total.
Delivery Options
Not sure why they have included this when they could have added it above but the next section is another conditions area that allows you to apply or not apply Free delivery to the products that you want to qualify.
All you have to do here is go through the motions of selecting new conditions for Free delivery or replicating the conditions higher up and free delivery will be applied.

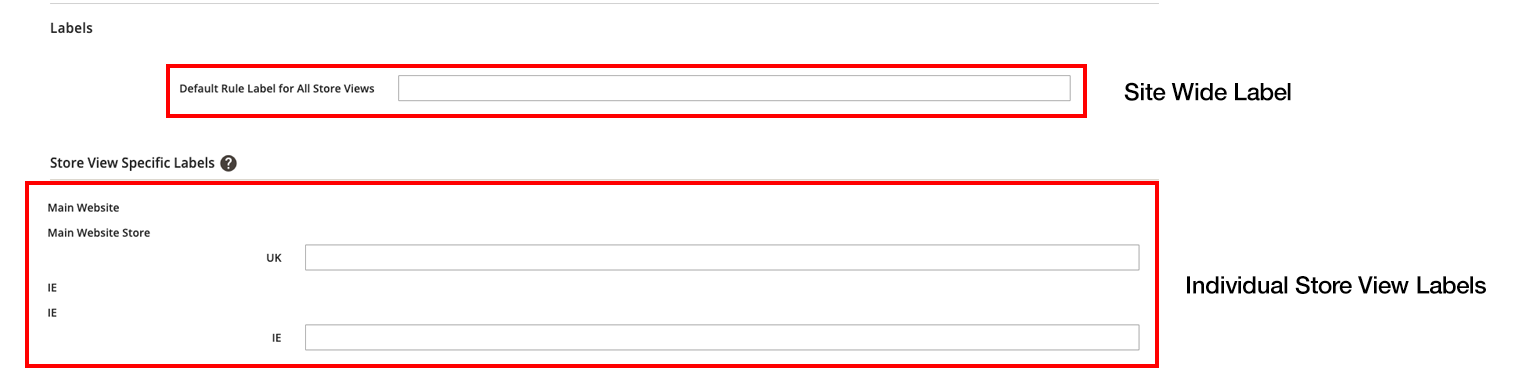
Checkout Label
You can also specify a store wide label for your discount that will appear at checkout. Usually people use a short description of what the discount is i.e "5% Off"
If you have multiple stores though and want this to be different store to store then just below the default rules labels section there is a store specific section where all your stores will be listed and the specific labels can be changed.
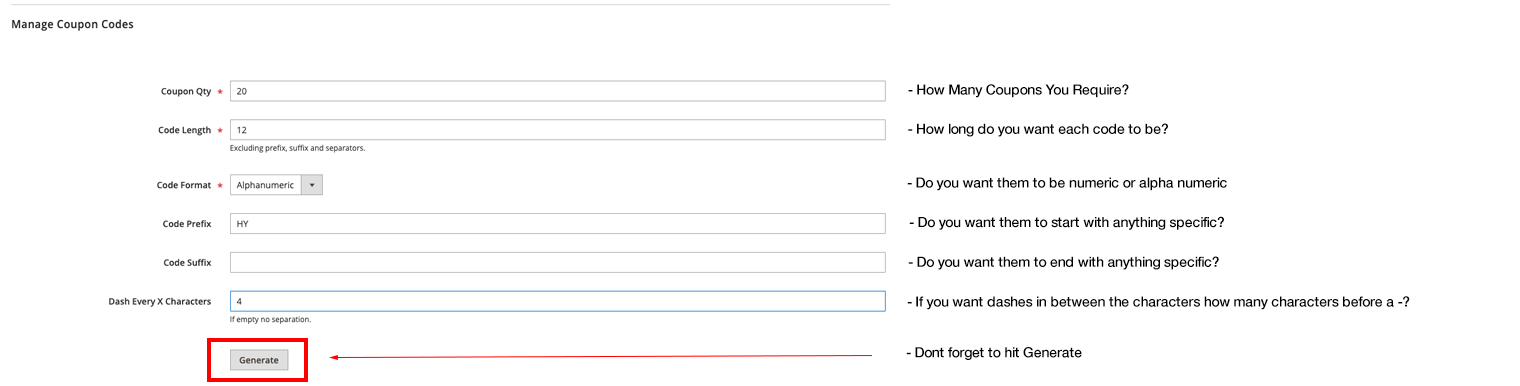
Manage Coupon Codes
Lastly if you wanted to generate some coupon codes to distribute or give to the likes of Groupon you can do this by ticking the auto generation box near the top of the page and then setting up your coupon/voucher requirements in the Manage Coupon Section.
- Decide how many coupons/vouchers you want to generate
- Select the length of the code
- If you wish to you can set a prefix and/or suffix for your codes
- Finally you can decide if you want dashes in them or not.
- If you want them to be used as many times as the customer likes then leave the uses per coupon field blank. Usually in cases where you generate vouchers you would only want them to be used once so make sure this is set to 1.
- Click save and wait for your vouchers to generate
That's really all there is to creating both Cart and catalog rules. Once you understand the condition rules it's really only your imagination that will hold you back. To help you out though we have put together a special list of the most used cart rules to help you convert better along with step by step instructions on how to set them up. All you have to do to get your hands on them is subscribe to our mailing list which you can do at the bottom of this post.